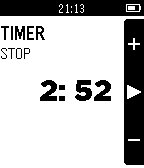
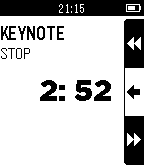
ActionBarLayerのメモ。
ActionBarLayerは右側にちょっとでてくるバーです。

割と簡単に追加できて、操作がわかりやすくなるので中々便利なやつです。
ActionBarLayerの例としては、Pebble標準のMusicがわかりやすいです。
地味な動作ですがこのバーはボタンを押すと連動してバーが反転します。この動作は勝手にやってくれます。

ActionBarLayer自体はただのレイヤーなので何か処理をするということはなくて、ボタンの処理はwindow_single_click_subscribeで登録するclick_handlerを使って実装します。
API
| API | 説明 |
|---|---|
| action_bar_layer_create | ActionBarLayerを作成 |
| action_bar_layer_destroy | ActionBarLayerを破棄 |
| action_bar_layer_add_to_window | windowに対してActionBarLayerを追加する) |
| action_bar_layer_set_click_config_provider | ボタンクリック時の処理を登録する関数を登録する |
| action_bar_layer_get_layer | 指定したActionBarLayerのルートレイヤを取得 |
| action_bar_layer_remove_from_window | ActionBarLayerを取り除く |
| action_bar_layer_set_icon | アイコンを設定 |
| action_bar_layer_clear_icon | アイコンを削除 |
| action_bar_layer_set_background_color | 背景色を設定 |
| action_bar_layer_set_context | ClickHandlerとClicConfigProviderのコールバックに渡されるcontextを設定 |
例
pebble api documentationにある例です。
[code lang=c]
// 変数の宣言
ActionBarLayer *action_bar;
…
// 上ボタンと下ボタンにそれぞれmy_previous_click_handerとmy_next_click_handerを設定している
void click_config_provider(void *context) {
window_single_click_subscribe(BUTTON_ID_DOWN, (ClickHandler) my_next_click_handler);
window_single_click_subscribe(BUTTON_ID_UP, (ClickHandler) my_previous_click_handler);
}
void window_load(Window *window) {
…
// ActionBarLayerを作成
action_bar = action_bar_layer_create();
// windowにaction_barを追加する
action_bar_layer_add_to_window(action_bar, window);
// click_config_provider関数を渡してクリックイベントの登録
action_bar_layer_set_click_config_provider(action_bar, click_config_provider);
// 読み込んだアイコンを設定
action_bar_layer_set_icon(action_bar, BUTTON_ID_UP, &my_icon_previous);
action_bar_layer_set_icon(action_bar, BUTTON_ID_DOWN, &my_icon_next);
}
[/code]
action_bar_layer_createして、action_bar_layer_add_to_windowすればとりあえずバーは表示されます。
次に、action_bar_layer_set_click_config_providerでclick_config_providerを渡して上げることでクリックイベントの登録をします。
ここで、ボタンを押した時に何か動作させることが出来ます。
最後に action_bar_layer_set_iconでアイコンをセットしています。
[code lang=c]
action_bar_layer_set_icon(action_bar, BUTTON_ID_UP, &my_icon_previous);
[/code]
action_bar_layer_set_iconにaction_barのポインタ、ボタンのID、アイコンへのポインタを渡しています。
アイコンの読み込み
- 14x14pxの白黒のpng画像を作ります。macでpixelmatorを使っている方は、「pixelmatorでドット絵を描く方法を紹介 | 川崎に住んでるアプリ開発(予定)者のブログ」でドット絵が描けます。
-
pebbleプロジェクトのresourcesディレクトリの中にコピーします。下の例では更にimagesディレクトリを作成してそこに格納しています。
-
appinfo.jsonのresourcesのmediaに追加します。
appinfo.json
[code lang=javascript]
“resources”: {
“media”: [
{
“type”: “png”,
“name”: “IMAGE_ACTION_ICON_PREVIOUS”,
“file”: “images/previous.png”
},
{
“type”: “png”,
“name”: “IMAGE_ACTION_ICON_NEXT”,
“file”: “images/next.png”
}
]
}[/code]
- pebbleのコードを書きます。
[code lang=c]
static GBitmap *my_icon_previous;
static GBitmap *my_icon_next;static void create_resource() {
my_icon_previous = gbitmap_create_with_resource(
RESOURCE_ID_IMAGE_ACTION_ICON_PREVIOUS);my_icon_next = gbitmap_create_with_resource(
RESOURCE_ID_IMAGE_ACTION_ICON_NEXT);}
[/code]
まとめ
ボタンを長押したときに、ActionBarLayerのアイコンを変更して、その後のボタンクリック時動作を変更すれば、pebbleのMusicアプリみたいなことが出来ます。